GST Registration Process
The GST registration process step by step - Part A, Part B, Aadhaar authentication, and how long it really takes.


2000
Happy Clients

1500
Expert Advisors

2+
Branch Offices
Free Consultation by Expert
.png)


.png)
.png)
GST Registration Process - Step by Step
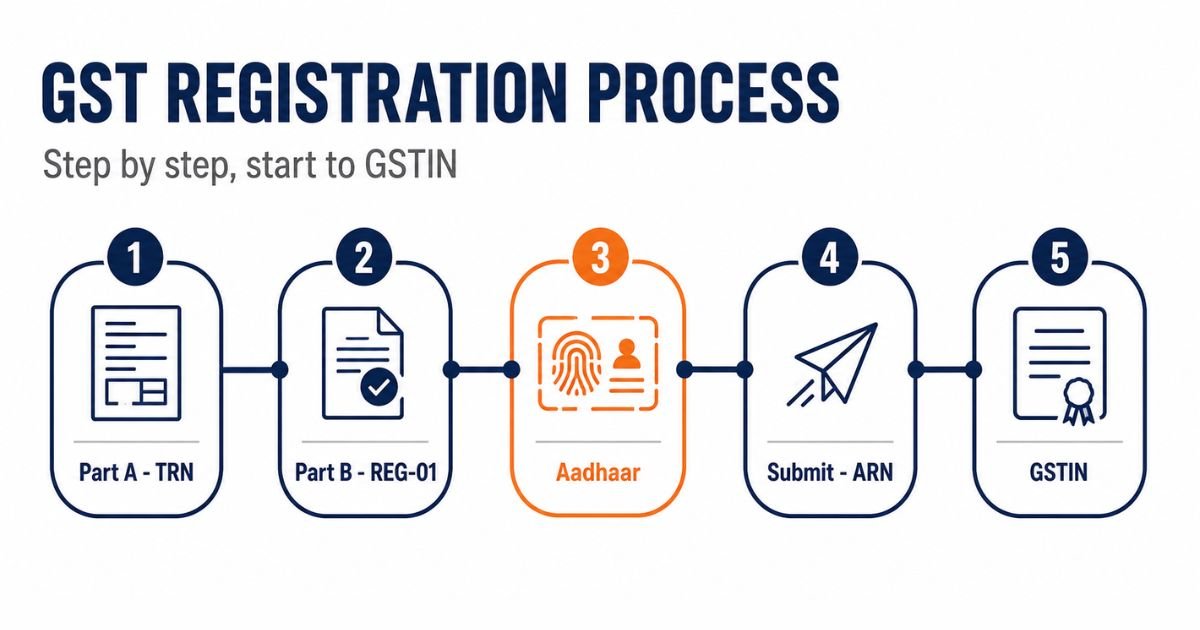
The GST registration process is done fully online on the government portal at gst.gov.in. There is no paperwork to post and no office to visit. You fill the application in two parts, Part A to get a temporary number, and Part B to complete the full application. For a straightforward case where you authenticate with Aadhaar, you can have your GSTIN in a few working days.
This page walks you through the whole process, step by step, and is honest about the parts where people get stuck. It also covers how long it really takes and the newer faster route. If you first want to know whether you need to register at all, or which type suits you, see the GST registration page and our page on the types of GST registration.

Expertise in GST Registration Process

Enquiry Form
Among Asia Top
100
Consulting Firm

Get Consultation
Lowest Fees
100,000 + Clients.

Service Delivery
4.9 Customers Rating
50+ Offices
Contact us today to schedule your appointment.
You can call us on +919953004880 or write to us at info@efilingcompany.com
Before You Start
The application times out if you leave it too long, and it is annoying to get halfway and realise you are missing something. So keep these ready before you begin:
- The PAN of the business or the applicant
- A mobile number linked to your Aadhaar, because Aadhaar authentication decides how fast your registration goes
- Proof of your business address, such as an electricity bill and a rent agreement
- Bank account details, such as a cancelled cheque or a bank statement
- A photograph of the applicant, and the promoter or partner details
This is the short list to get you started. The full list of what is accepted for each document is on our GST registration page. Getting the documents right the first time is the single biggest thing that keeps your application moving.
Part A - Getting Your TRN
Part A is the short first half. Its only job is to give you a Temporary Reference Number, or TRN, which you then use to fill the real application.
- Go to www.gst.gov.in, then Services, then Registration, then New Registration
- Select New Taxpayer, and enter your PAN, mobile number, email, and state
- Complete the OTP sent to your mobile and email
- Your TRN is generated and shown on the screen
That TRN is only meant for the gap before you submit. It stays valid for a limited window of 15 days, so use it to complete Part B without sitting on it for weeks. To return to your saved application, go back to New Registration and select the TRN option instead of New Taxpayer.
Part B - The Full Application
Part B is the main application. This is where you fill in everything about your business. On the portal this is Form GST REG-01, and it is spread across a few tabs. Take it one tab at a time.
- Business details. Trade name, constitution of business, and the date you became liable to register.
- Promoter or partner details. The personal and identity details of the people who own or run the business, up to the number the form allows.
- Authorised signatory. The person who will be responsible for filing returns and signing the application.
- Principal place of business. The main business address, with the supporting proof such as an electricity bill or rent agreement.
- Additional places of business. Any other locations you operate from, if you have more than one.
- Goods and services. The main goods or services you deal in, with their HSN or SAC codes.
- Bank account. Your business bank details.
- Verification. The final step where you submit the application, covered next.
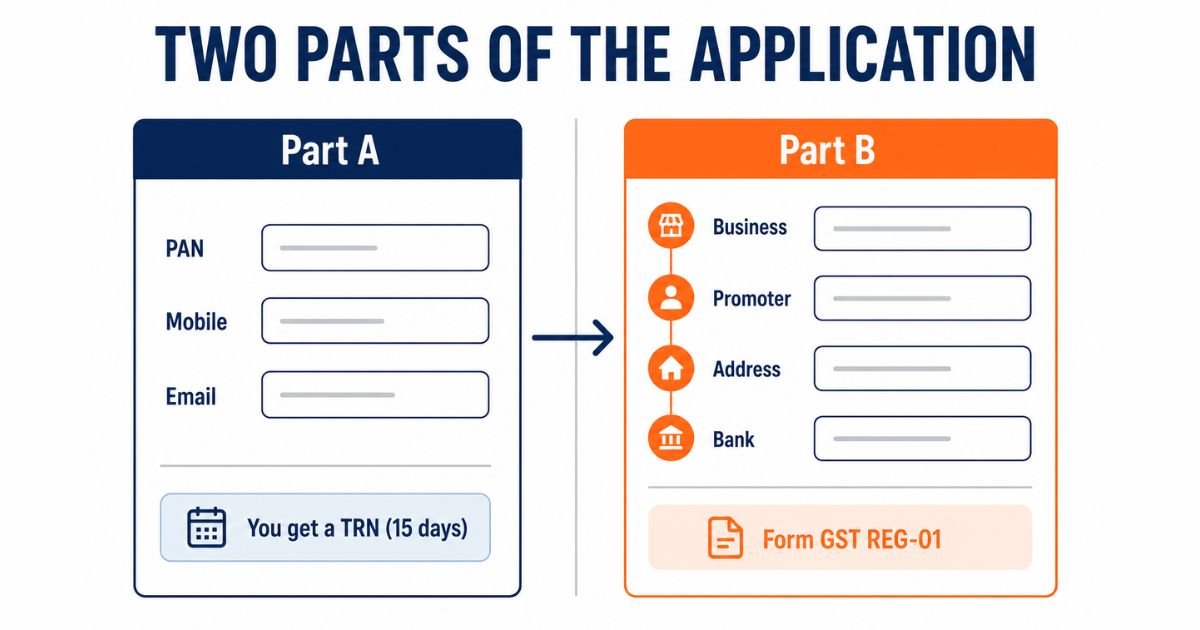
None of these tabs is hard on its own. The one that causes the most trouble is the principal place of business, because the address on your proof has to match what you enter. We come back to that later.
Aadhaar Authentication - The Step That Decides Your Timeline
This is the part most guides bury inside a step, but it matters more than any other single choice you make, so it gets its own place here.
During the application you are offered Aadhaar authentication. What you do here decides how your registration is handled:
- If you complete Aadhaar authentication, your application usually moves faster and often does not need a physical visit to your premises.
- If you do not authenticate with Aadhaar, or your case is picked for extra checking, your business premises may be marked for physical verification, which adds time.
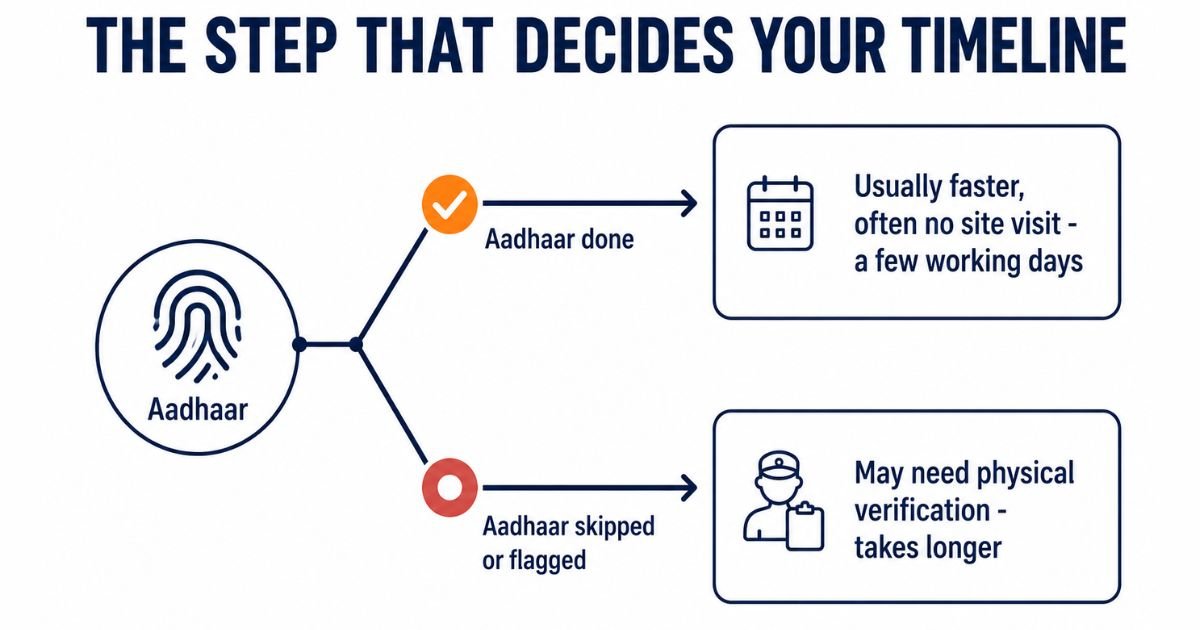
So unless you have a specific reason not to, completing Aadhaar authentication is the smoother path. It is the difference between a registration that clears in a few working days and one that waits on a site visit.
Verifying and Submitting
Once every tab is filled, you submit the application. There are three ways to sign and submit it:
- DSC, a Digital Signature Certificate. This is compulsory for companies and LLPs.
- EVC, an electronic verification code sent as an OTP to the registered mobile.
- E-Sign, an Aadhaar-based signature option.
If you are signing with DSC, you also need the Emsigner utility installed and running on your computer, and the DSC token plugged in. This catches a lot of people out, because the DSC option simply will not work until Emsigner is running. For a company or an LLP, sort out the DSC and Emsigner before you reach this step, so you are not stuck at the finish line.
After You Submit - ARN and What Happens Next
The moment you submit, the portal generates an Application Reference Number, or ARN, in Form GST REG-02. This is your proof that the application has reached the department, and it is what you use to track progress.
From here, the officer reviews your application. One of two things happens. Either it is approved and your GSTIN is issued, or the officer raises a query in a notice called Form GST REG-03, to which you reply in Form GST REG-04. If you reply properly and on time, the application moves ahead.
You can follow all of this on our GST ARN status page, which explains what each status means and what to do about it. Once you are approved, you download your certificate, which we cover on the GST certificate download page.
How Long Does GST Registration Take?
This is the question everyone asks, and the honest answer is that it depends mainly on whether you authenticate with Aadhaar and whether your case is picked for physical verification.
For a straightforward application where you complete Aadhaar authentication and there are no queries, approval usually comes within a few working days. If your case goes for physical verification, or the officer raises a clarification query, it takes longer, because the clock then includes the time for the visit or for you to reply.
There is also a newer, faster route worth knowing about.
VERIFY: Rule 14A, introduced through Notification 18/2025-CT with effect from 1 November 2025, provides an optional risk-based route that grants registration within 3 working days for eligible applicants. Confirm the exact eligibility conditions and any threshold against the notification text before stating them here. No competitor page currently mentions this route, so it is worth getting right and keeping current.
One honest point the smoother guides skip. A first-time applicant, a residential address, or a rented premises with a weak paper trail tends to attract more checking than an established business at a commercial address. This is not a rule written down anywhere. It is simply the pattern, and it affects how long you wait.
The Rules Behind the Process
If you like to know which rules govern what you are doing, two are worth naming.
Rule 8 covers the application itself, which is the Part A and Part B process you have just read, including the PAN, mobile, and email verification that generates your TRN.
Rule 9 covers what happens after you submit, which is the verification of your application by the officer and the timeline for approval, or for raising a query, or for rejection.
You do not need to quote these to register. But if you ever see a reference to Rule 8 or Rule 9 of the CGST Rules in a notice or a form, this is what they are about.
What Usually Trips People Up
The process is straightforward on paper. In practice, a handful of things cause most of the delays, and knowing them in advance saves you the trouble.
- Address proof that does not match. The address on your electricity bill or rent agreement has to match the address you enter. A mismatch, an expired document, or a bill in someone else's name without a supporting NOC is the most common reason for a clarification notice.
- Clarification notices. If the officer raises a query in Form GST REG-03, you have a limited window to reply in Form GST REG-04. Missing that window usually ends in rejection, and then you start again.
- The bank detail step after approval. Under Rule 10A, you have to furnish your bank account details on the portal within a set time after registration. People get the GSTIN, start invoicing, and forget this step entirely.
- Wrong contact details. Everything from the portal goes to the mobile and email you entered. Enter them carefully, because fixing them later is far harder than getting them right the first time.
Most of these come down to careful document work before you apply, not anything clever during the application.
Get Help With Your GST Registration
If you would rather have this handled properly the first time, we do GST registrations end to end, from getting your documents in order to replying to any clarification the officer raises. It is often the difference between a clean approval and weeks of back and forth.
Call +91 99530 04880 or write to info@efilingcompany.com and tell us about your business.